This guidance advises on how to set up KashFlow and the PayPal importer. Please note that for this to be successful you must have enabled third party permissions as described in Step 1 of this process.
Linking PayPal & KashFlow
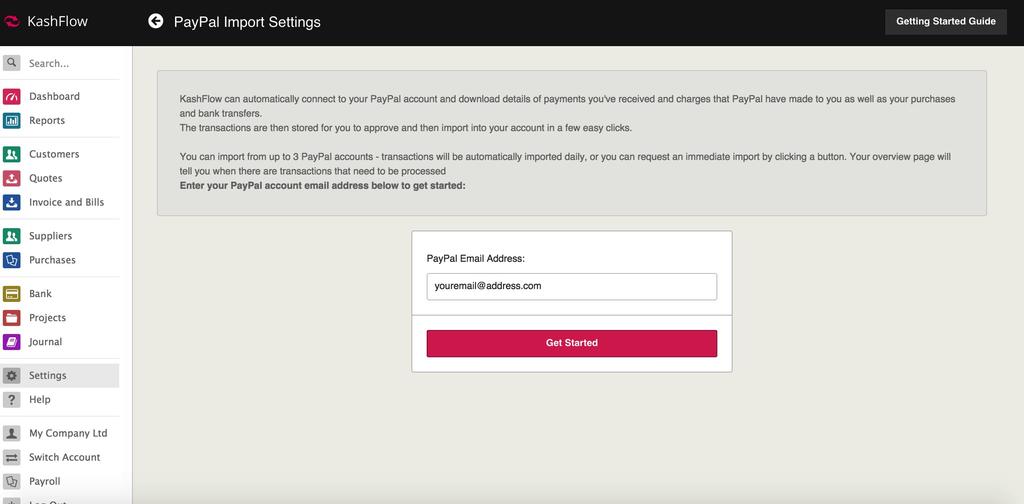
To start, go to Apps> PayPal. In the PayPal E-Mail Address field enter in your registered PayPal e-mail address and click Get Started.
You will then be sent an e-mail to that address requesting permission for KashFlow to integrate. To grant your permission click the Click here to authorise this request link at the bottom of the page. You will then be directed to a KashFlow page for your to give your final confirmation to grant the authorisation, click Authorise to continue.
Initial KashFlow Setup
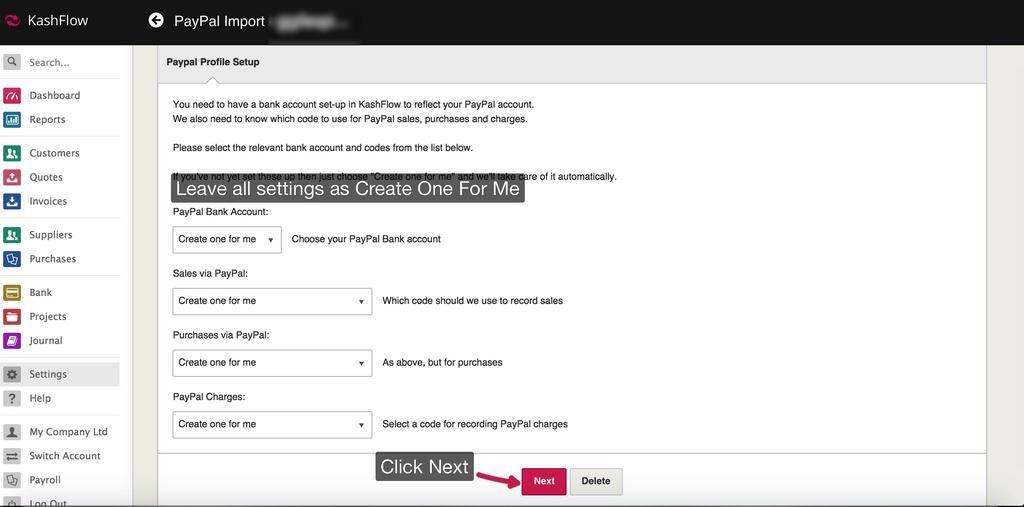
When you’ve fully authorised KashFlow and Paypal you’ll be presented with your basic PayPal Settings. If you’ve not previously used KashFlow before then we strongly advise that you leave all these settings as Create One For Me.
- PayPal Bank Account – this is an account in KashFlow that will mirror you PayPal bank account. If you’ve not created a dedicated PayPal bank account in KashFlow already then leave this as Create One For Me.
- Sales Via PayPal – this is the sales type that will be recorded against PayPal sales. Sales Types are used for reporting, if your unsure or haven’t set a dedicated one up for PayPal leave this as Create One For Me.
- Purchases Via PayPal – this is the outgoing type that will be recorded against PayPal purchases. Outgoing Types are used on your reports. Like before if you’re unsure or haven’t set one up leave this as Create One For Me.
- PayPal Charges – this is the bank transaction type for all PayPal charges and fees for transactions. All PayPal fees and charges are taken care of automatically in KashFlow, these will be discussed in the next step. It’s very important that PayPal charges have their own nominal code, if you’ve not set one up leave this as Create One For Me.
When ready, click Next. You’ll then be taken to the advanced KashFlow set up which is discussed below.
Advanced KashFlow Setup
The next screen will present you with some advanced options for using the PayPal Importer. You should review all of these settings using this guidance.
General Settings
- PayPal Email Address – this is your PayPal e-mail address, this should only be changed if you change your registered PayPal e-mail address.
- Start Date – this is the date that you would like to import from. For example, to import all your PayPal transactions from January 1st 2011 enter, “01/01/2011”. This needs to be in DD/MM/YYYY format.
- PayPal Bank Account – this is the bank account in KashFlow that should mirror your real PayPal bank account. If setup by KashFlow it will be titled “PayPal ([email protected])
- Transfers Account – This is the bank account where you receive all your PayPal withdrawals. This is normally your business account.
- Accounts & Codes – These are the nominal codes used to record your paypal sales, purchases and charges and fees. If created by KashFlow these will be titled PayPal Sales, PayPal Purchases & PayPal Charges.
- Transaction ID – Ticking this will include the PayPal transaction ID when importing. We strongly advise that you tick this.
- Disabled – Ticking this will prevent anything from getting imported.
Invoices & Customers
- Customers – Choose if to create individual customers for your PayPal transactions using their PayPal details, or to just use a single general PayPal customer.
- Customer VAT Settings – Ticking this box will mark a customer as EC or non-EC based on their registered country in their PayPal Profile. For example, if a customer is based in Germany they will be marked as based in another EC member state, similarly, if a customer is based in Canada they will be marked as non-EC.
- Use PayPal Rates – If VAT is charged to the customer at the time of the sale and is visible on the PayPal receipt (i.e. the customer when checking out sees £100 net + £20 VAT/Sales Tax) then ticking this will use this figure. If unticked, the VAT rate below will be used.
- VAT Rate – If you’ve got the Use PayPal Rates box above unticked, then you can apply a flat rate of VAT to all your transactions. For example, if you selected 20% here and you imported a transaction for £120, then KashFlow will automatically split this into £100 net and £20 VAT. If you’ve got the box for use PayPal rates ticked then this option is ignored.
- EC Sales – Tick this box to apply VAT to sales for customers based inside the EC. For example, if ticked and a sale is made to a customer in Germany then VAT will be applied.
- Non-EC Sales – Tick this box to apply VAT to customers based outside the EC. For example, if ticked and the sale is made to a customer based in China then VAT will be applied.
Purchases & Suppliers
- Suppliers – Choose if to create individual suppliers based on the details that are entered when purchasing from PayPal or to attach all purchases to a single supplier.
- Payment Method – Choose what payment method to use on purchases paid via Paypal.
- VAT Rate – Choose what VAT rate to apply to all PayPal Receipts. This will only apply if the Use PayPal Rates box is not ticked below.
- Other Currency Purchases – Ticking this will apply VAT to all purchases made in other currencies other than your home currency.
- Use PayPal Rates – If VAT is charged to you at the time of the purchase and is visible on the PayPal receipt (i.e. when checking out you see £100 net + £20 VAT/Sales Tax) then ticking this will use this figure. If unticked, the VAT rate defined above will be used.
Transaction Types / Status Settings
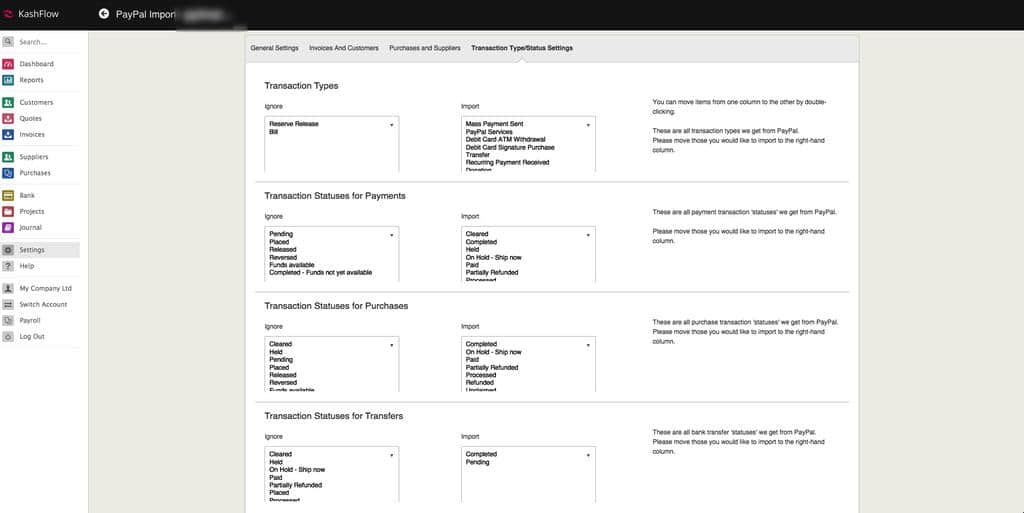
These settings configure what is and isn’t imported into PayPal. We strongly advise that you leave the default selecting in place as these are set to only import the correct transactions. For reference, the default layout is included below.
When ready, click Update. You’re now ready to import all your transactions.
Preparing to Import
The next screen you are taken to is the initial import screen. Click the Import button to begin to bring all your transactions into KashFlow. This can take some time if you’ve got a lot of transactions to bring in, if it takes longer than an hour or you get an error status please see our PayPal Importing Troubleshooting guidance.


