You can create additional users in IRIS KashFlow Connect by going to Your Account > Additional Users. By using this feature you can group clients to specified additional users which will then allow them to have their own IRIS KashFlow Connect login. When they log into IRIS KashFlow Connect they will only see and have access to their own clients.
An Additional User of IRIS KashFlow Connect can log in by the same method as the main user by going to this link.
To view your current additional users you will need to log in as the main user (or as additional user set as “Admin”) and go to the icon in the top right corner and select “Additional Users”.

Create a new Client Manager
From this screen, you will be able to create new users by clicking on the “Add User” button:

On the first step of the wizard, you will need to enter the name and email address of the new user:

On Step 2, you will need to select which clients you wish this additional user to have access to:

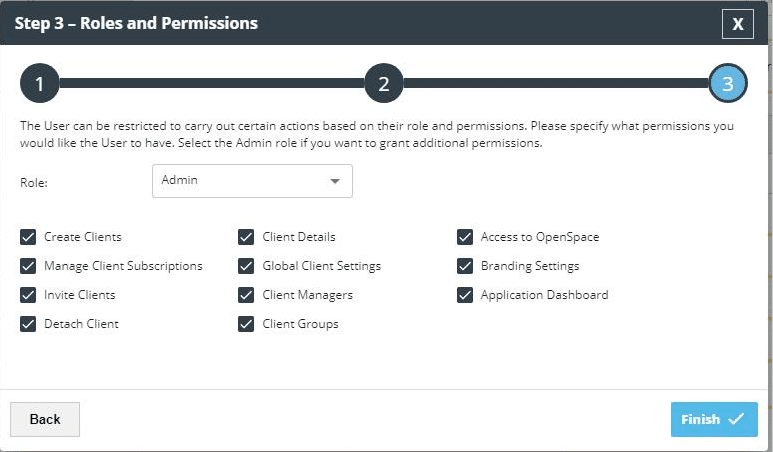
Step 3 – Selecting the role:
You have the option of creating a role of “Admin” or “Client Manager”. The difference between these two roles will be the default permissions. As a “Client Manager” they will not have access to; Detach Clients, Global Client Settings, Client Managers, Branding Settings.
Once you have selected the role, you can then decide to set further restrictions for that particular user.
Admin:
Client Manager:

Once you click on “Finish” the user account will be created and the account activation email is sent to the email address of the new user.
Changing the role of an additional user
If you wish to upgrade a “Client Manager” to an “Admin” later on then you can do this by going to Your Account > Additional Users and put a tick in the box for the user you wish to upgrade, and then click on the button for “Assign Admin Role” which will become available.

Managing Additional Users
From the Additional User screen, there are other “Actions” you can complete from the designated column.
Resend Activation Email
From the screenshot below, if you click on the envelope icon you will be able to resend the activation email for an additional user. If the additional user doesn’t manage to activate the account before the original email expires, you can resend it from this button.

View Clients
From the screenshot below, if you click on the icon with three people you will be able to see the clients that are assigned to that additional user. You can also add and remove clients assigned to that additional user from this screen.

Edit and Delete
From the screenshot below, if you click on the pencil icon you can edit the details of that additional user. Or if you click on the recycling bin you can delete the record.
