You are able to add an expense receipt which will appear in your list of Purchases.
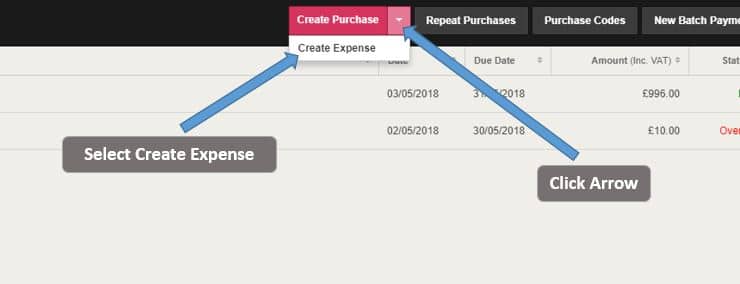
To do this you will need to go to Purchases and at the top of the screen and select the down arrow next to “Create Purchase”. From here you will be able to select “Create Expense”.
You will then see a screen for “Create Quick Expense” and you will need to fill in the following information:

What did you buy: This is a brief description of the expense you are entering.
Where From: You can then select an existing Supplier account, or you can create a new supplier by typing the company name directly into this field. This will then create a Supplier account which you can add more information to later on. You can do this by going to Suppliers and select the supplier account from the list. You can find more information on how to update a supplier account by going to this knowledge base article.
When: This is the date of the expense.
Account: You can select the bank account the expense was paid from. If the account isn’t listed you will need to create this by going to Bank> Add New Account.
How did you pay: Here you can choose the options of cheque; company credit card; company debit card; or other.
Category: This is the nominal code you wish to assign your expense to. If the nominal code isn’t listed you can create a new one by clicking the plus button next to the drop down box.
Amount: The is the amount of your expense, you can then select the VAT option in the field next to this.
Comments: Here you can add additional comments. This will appear in the “Comment” field when viewing the bank account transactions.
Attachment: If you have your Dropbox account linked to KashFlow you can also attached images of your receipts. These attached files will automatically be uploaded to your Dropbox account. If you haven’t linked your Dropbox account yet you can do this by going to Apps> Dropbox> Connect to Dropbox and then follow the steps on screen.
When you add an expense, this will automatically mark the expense as paid from the bank account and it will create a payment within your selected bank account. You are unable to log an unpaid expense using this method.
Once you have added your expenses, you are able to see these listed by going to Purchases screen. Under the “Type” column you will see which transactions are expenses or purchases.

You can also add expenses from the Dashboard when you first log in. You will need to select the arrow next to Create Invoice at the top of the screen and select “Create Expense”.
